Character Sheet
Overview
Walkthrough
Initialize the Project
Begin by creating a new project called character-sheet
turbo init character-sheetThis initializes a Rust project with the following structure:
character-sheet/ # Your project's root directory.
├── src/ # The directory of your code.
│ └── lib.rs # The main file for the game.
├── Cargo.toml # Rust project manifest.
└── turbo.toml # Turbo configuration. Create state.rs and player.rs files
Inside your project directory, create a file named state.rs. This file will contain your state machine. You'll learn more about state machines as you progress through this tutorial.
your-project-dir/ # Your project's root directory.
├── src/ # The directory of your code.
│ └── lib.rs # The main file for the game.
| └── state.rs # The main file for your state machine.
├── Cargo.toml # Rust project manifest.
└── turbo.toml # Turbo configuration.Create another file and call it player.rs. This file will contain your player struct.
your-project-dir/ # Your project's root directory.
├── src/ # The directory of your code.
│ └── lib.rs # The main file for the game.
| └── state.rs # The main file for your state machine.
| └── player.rs # The main file for your player.
├── Cargo.toml # Rust project manifest.
└── turbo.toml # Turbo configuration.Enabling Other Files
Add the following lines of code to the top of each file.
- lib.rs
use turbo::*;
use state::*;
mod state;
use player::*;
mod player; - state.rs
use crate::*;
- player.rs
use crate::*;
This will allow the code we write in state.rs and player.rs to be recognized inside of lib.rs and vice versa. Don't forget to save each file with Cmd+S or Ctrl+S.
Run the Game
At this point, we can run our game and leave it running as we make changes. Don't worry, it is just a blank screen for now!
turbo run -w character-sheetNow lets go through each individual file and add some code to start making our character sheet work.
state.rs
Add this code to your state.rs file. This is an enum we'll use for switching screens:
use crate::*;
#[turbo::serialize] // add this above structs and enums
pub enum Screen {
Character,
Inventory,
Loadout,
} player.rs
Add this code to your player.rs file. These structs and enums will build out the basis of our character, inventory, and loadout screens.
use crate::*;
#[turbo::serialize] // add this above structs and enums
pub struct Player {
pub name: String,
pub max_hp: f32,
pub current_hp: f32,
pub atk: f32,
pub crit: f32,
pub inventory: Vec<Item>,
pub inventory_index: usize,
pub inventory_slots: usize,
pub loadout: Loadout,
pub loadout_index: usize,
pub loadout_slots: usize,
}
impl Player {
pub fn new() -> Self {
Self {
name: "Shell".to_string(),
max_hp: 100.0,
current_hp: 100.0,
atk: 1.0,
crit: 2.0,
inventory: vec![
Item {
name: "HP Potion".to_string(),
description: "HP +50".to_string(),
quantity: 1,
}
],
inventory_index: 0,
inventory_slots: 4,
loadout: Loadout {
weapon: Weapon::Sword,
passive: "ATK Up".to_string(),
},
loadout_index: 0,
loadout_slots: 2,
}
}
}
#[turbo::serialize]
pub enum Weapon {
Sword,
Gun,
}
#[turbo::serialize]
pub struct Item {
pub name: String,
pub description: String,
pub quantity: u32,
}
#[turbo::serialize]
pub struct Loadout {
pub weapon: Weapon,
pub passive: String,
} By adding an impl for the Player we can initialize it in GameState with a new() function. We also have an enum for our Weapon and structs for the Item and Loadout. We'll be altering these values and adding more functions to our impl later!
We also added in values like the index and slots for our inventory and loadout
lib.rs & GameState Initialization
Now we can head into lib.rs and add the following fields to GameState
use turbo::*;
use state::*;
mod state;
use player::*;
mod player;
#[turbo::game]
struct GameState {
screen: Screen,
player: Player,
frames: u32,
spawned: bool,
equip: bool,
}
impl GameState {
pub fn new() -> Self {
// initialize your game state
Self {
screen: Screen::Character,
player: Player::new(),
frames: 0,
spawned: false,
equip: false,
}
}
pub fn update(&mut self) {
// This is where your main game loop code goes
// The stuff in this block will run ~60x per sec
}
}Adding in the State Machine
Now we'll add an empty state machine to the state.rs file. We'll use it to change between screens.
use crate::*;
#[turbo::serialize] // add this above structs and enums
pub enum Screen {
Character,
Inventory,
Loadout,
}
pub fn state_machine(state: &mut GameState) {
match state.screen {
Screen::Character => {
}
Screen::Inventory => {
}
Screen::Loadout => {
}
}
} And then we'll call the state_machine function from our update loop, so that it is always running.
pub fn update(&mut self) {
// This is where your main game loop code goes
// The stuff in this block will run ~60x per sec
state_machine(self);
}Make sure to save your project after adding it in.
Adding in our player sprite
Now that we have the foundation, we can work on the visuals! Lets start by displaying our character in the middle of the screen and start creating their character screen
Inside your project directory, create a folder named sprites.
your-project-dir/ # Your project's root directory.
├── sprites/ # The directory of your sprite assets.
├── src/ # The directory of your code.
│ └── lib.rs # The main file for the game.
| └── state.rs # The main file for your state machine.
| └── player.rs # The main file for your player.
├── Cargo.toml # Rust project manifest.
└── turbo.toml # Turbo configuration.Add the following files to the sprites directory.
Character Screen
Lets display our player character and start building a stat screen around him in the Screen::Character portion of our state_machine
We just need one line of code to draw the sprite. Make sure to save after this, and now you should see the character on screen.
pub fn state_machine(state: &mut GameState) {
match state.screen {
Screen::Character => {
sprite!("player#Idle");
}
Screen::Inventory => {
}
Screen::Loadout => {
}
}
}
We want to add a little bit more though. Go ahead add the following and lets break it down:
pub fn state_machine(state: &mut GameState) {
match state.screen {
Screen::Character => {
state.frames += 1;
let character = animation::get("character");
sprite!(
animation_key = "character",
default_sprite = "player#Idle",
);
if !state.spawned {
character.use_sprite("player#Spawn");
character.set_repeat(1);
state.spawned = true;
}
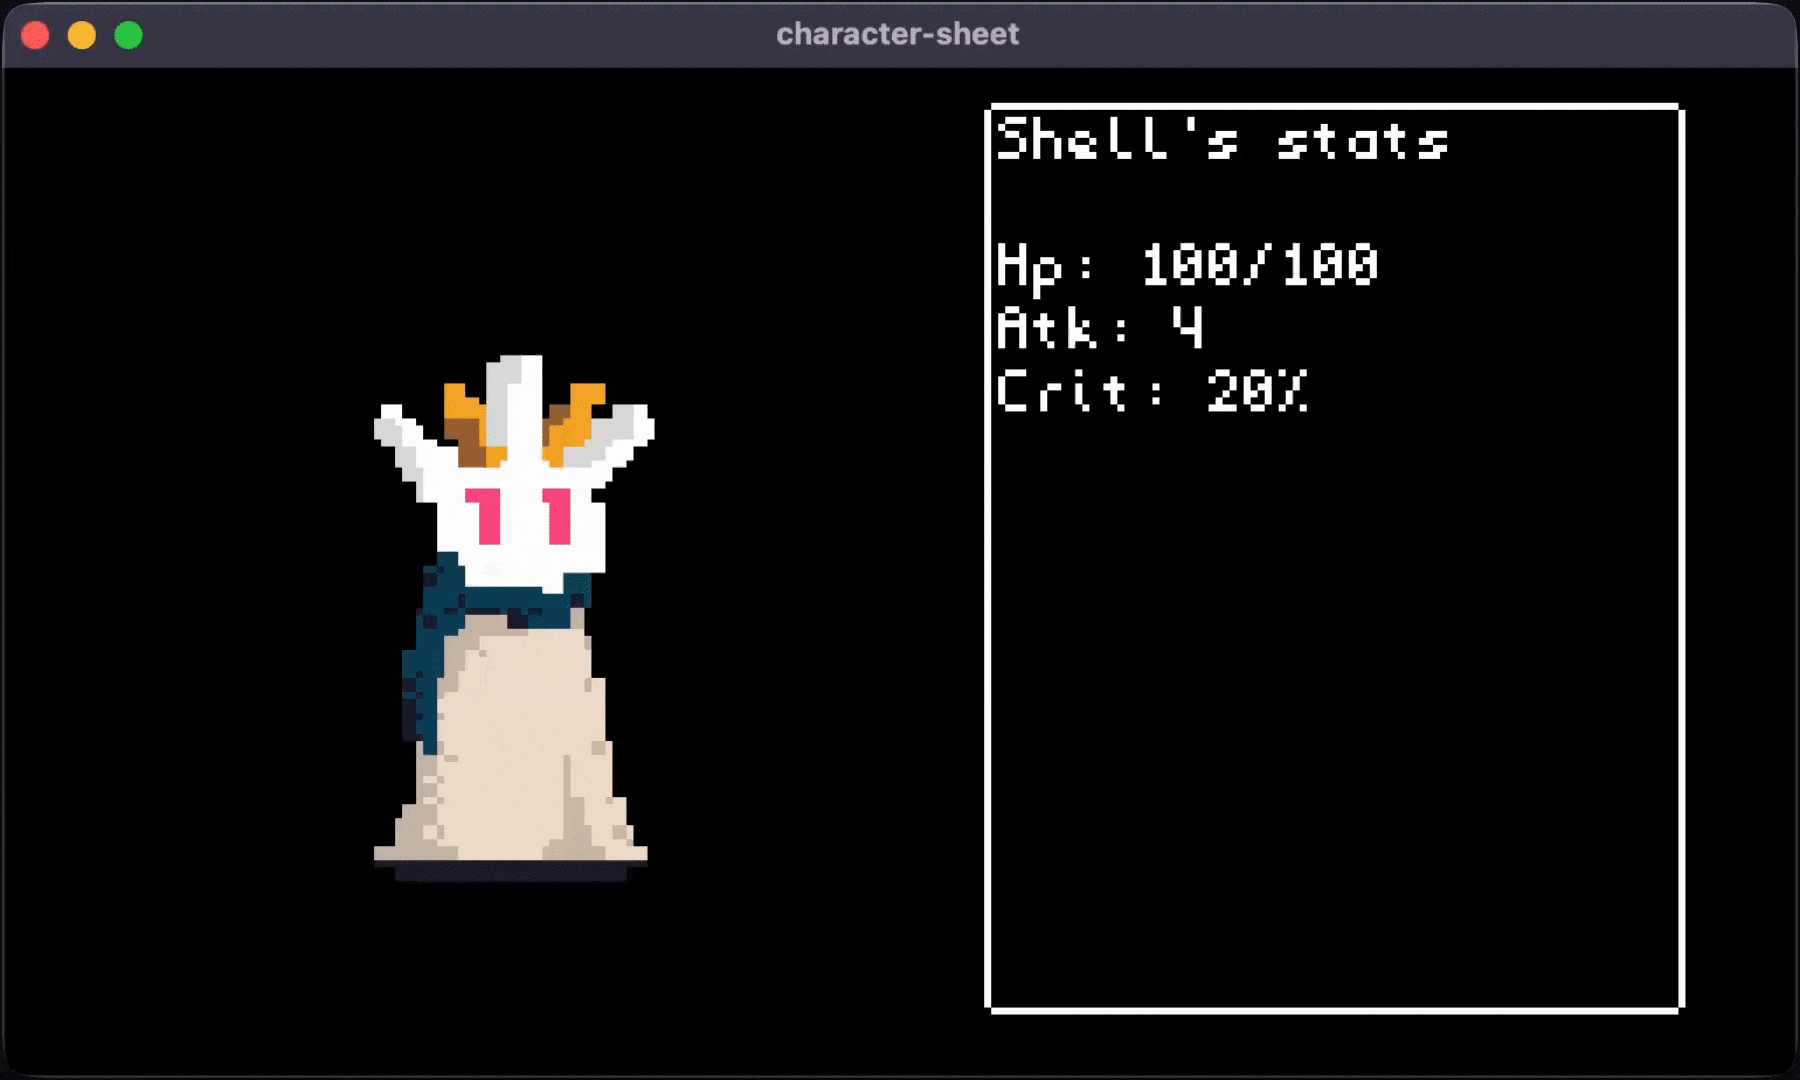
rect!(x = 140, y = 5, w = 100, h = 130, color = 0x000000ff, border_color = 0xffffffff, border_size = 1, border_radius = 2);
let stats = format!("{}'s stats\n\nHp: {}/{}\nAtk: {}\nCrit: {}%", state.player.name, state.player.max_hp, state.player.current_hp, state.player.atk, state.player.crit);
text_box!(&stats,x = 142, y = 6, w = 98, h = 129);
if state.frames >= 360 {
let choices = ["player#Jump", "player#Crouch", "player#Dash"];
let idx = (random::u32() as usize) % choices.len();
let anim = choices[idx];
character.use_sprite(anim);
character.set_repeat(1);
state.frames = 0;
}
}
Screen::Inventory => {
}
Screen::Loadout => {
}
}
}
Nice, now we have our character screen set up! The first part of our code sets up our sprite animation. Then we check if we've spawned yet, and if not, we use the player#Spawn animation, and set it to repeat 1 time.
After that we use the format!() macro to build out the text that will go in our text box. Using format!() lets us grab the values from our variables and represent them as text.
Lastly, we made a system to change the character animation every 360 frames. Turbo's update loop runs at 60 frames per second, so 360 frames is 6 seconds. We put all the available animations into the choices array, and then choose one randomly and set that for our animation with use_sprite. Then we reset frames to 0 so we can start the count over again.
Adding State Machine controls
Lets build out the inventory screen next. Our first step needs to be adding functionality to switch screens.
pub fn update(&mut self) {
// This is where your main game loop code goes
// The stuff in this block will run ~60x per sec
state_machine(self);
if gamepad::get(0).a.just_pressed() {
self.screen = Screen::Inventory;
}
if gamepad::get(0).b.just_pressed() {
self.screen = Screen::Character;
}
if gamepad::get(0).x.just_pressed() {
self.screen = Screen::Loadout;
}
}Now if we press a we can switch to the Screen::Inventory and if we press b we can switch back to Screen::Character. We added in pressing x to switch to Screen::Loadout.
Adding Tweens and Const
If this is your first time seeing or hearing about tweens, awesome! Tweens allow for smooth transitions of f32 (decimal) values. They're easy to implement, and great for making your game look polished!
We need one Tween instance in the GameState for each value we want to be able to manipulate. In total we are going to add 8 tweens and initialize them, as well as a Const to the top. Consts are just values that don't change.
const POS: [(f32, f32); 4] = [(118.0,49.0), (154.0,34.0), (127.0,15.0), (101.0,34.0)];
#[turbo::game]
struct GameState {
screen: Screen,
player: Player,
frames: u32,
spawned: bool,
// x value tweens
slot_one_x: Tween<f32>,
slot_two_x: Tween<f32>,
slot_three_x: Tween<f32>,
slot_four_x: Tween<f32>,
// y value tweens
slot_one_y: Tween<f32>,
slot_two_y: Tween<f32>,
slot_three_y: Tween<f32>,
slot_four_y: Tween<f32>,
}
impl GameState {
pub fn new() -> Self {
// initialize your game state
Self {
screen: Screen::Character,
player: Player::new(),
frames: 0,
spawned: false,
// x value tweens
slot_one_x: Tween::new(118.0)
.ease(Easing::EaseOutCubic)
.duration(15),
slot_two_x: Tween::new(155.0)
.ease(Easing::EaseOutCubic)
.duration(15),
slot_three_x: Tween::new(128.0)
.ease(Easing::EaseOutCubic)
.duration(15),
slot_four_x: Tween::new(102.0)
.ease(Easing::EaseOutCubic)
.duration(15),
// y value tweens
slot_one_y: Tween::new(49.0)
.ease(Easing::EaseOutCubic)
.duration(15),
slot_two_y: Tween::new(35.0)
.ease(Easing::EaseOutCubic)
.duration(15),
slot_three_y: Tween::new(15.0)
.ease(Easing::EaseOutCubic)
.duration(15),
slot_four_y: Tween::new(35.0)
.ease(Easing::EaseOutCubic)
.duration(15),
}
}
pub fn update(&mut self) {
// This is where your main game loop code goes
// The stuff in this block will run ~60x per sec
state_machine(self);
if gamepad::get(0).a.just_pressed() {
self.screen = Screen::Inventory;
}
if gamepad::get(0).b.just_pressed() {
self.screen = Screen::Character;
}
if gamepad::get(0).x.just_pressed() {
self.screen = Screen::Loadout;
}
}
}The Tweens will give our inventory screen a lot of personality. The Const represent where our inventory slots will be located on the canvas. Now we can build out that Screen::Inventory
Inventory Screen
Inside our state machine in state.rs add the following:
Screen::Character => {
camera::reset();
state.frames += 1;
let character = animation::get("character");
sprite!(
animation_key = "character",
default_sprite = "player#Idle",
);
if !state.spawned {
character.use_sprite("player#Spawn");
character.set_repeat(1);
state.spawned = true;
}
rect!(x = 140, y = 5, w = 100, h = 130, color = 0x000000ff, border_color = 0xffffffff, border_size = 1, border_radius = 2);
let stats = format!("{}'s stats\n\nHp: {}/{}\nAtk: {}\nCrit: {}%", state.player.name, state.player.current_hp, state.player.max_hp, state.player.atk, state.player.crit);
text_box!(&stats,x = 142, y = 6, w = 98, h = 129);
match state.player.loadout.weapon {
Weapon::Sword => { state.player.atk = 6.0 }
Weapon::Gun => { state.player.crit = 20.0}
}
if state.frames >= 360 {
let choices = ["player#Jump", "player#Crouch", "player#Dash"];
let idx = (random::u32() as usize) % choices.len();
let anim = choices[idx];
character.use_sprite(anim);
character.set_repeat(1);
state.frames = 0;
}
}
Screen::Inventory => {
camera::set_xyz(110, 50, 2.0);
// define the slots and currently selected slot
let len = POS.len();
let idx = state.player.inventory_index % len;
let p1 = POS[(0 + idx) % len];
let p2 = POS[(1 + idx) % len];
let p3 = POS[(2 + idx) % len];
let p4 = POS[(3 + idx) % len];
// simplify the .get() of tween
let one_x = state.slot_one_x.get();
let one_y = state.slot_one_y.get();
let two_x = state.slot_two_x.get();
let two_y = state.slot_two_y.get();
let three_x = state.slot_three_x.get();
let three_y = state.slot_three_y.get();
let four_x = state.slot_four_x.get();
let four_y = state.slot_four_y.get();
// pair the x and y into one slot
let slot_one = (one_x, one_y);
let slot_two = (two_x, two_y);
let slot_three = (three_x, three_y);
let slot_four = (four_x, four_y);
// alter the size of the square according to if it's in the "front" slot //
let size_one = if state.player.inventory_index == 0 {(36, 36)} else {(17,17)};
let size_two = if state.player.inventory_index == 3 {(36, 36)} else {(17,17)};
let size_three = if state.player.inventory_index == 2 {(36, 36)} else {(17,17)};
let size_four = if state.player.inventory_index == 1 {(36, 36)} else {(17,17)};
// set the tween based on state.player.inventory_index
state.slot_one_x.set(p1.0); state.slot_one_y.set(p1.1);
state.slot_two_x.set(p2.0); state.slot_two_y.set(p2.1);
state.slot_three_x.set(p3.0); state.slot_three_y.set(p3.1);
state.slot_four_x.set(p4.0); state.slot_four_y.set(p4.1);
// draw it!
rect!(xy = slot_one, wh = size_one, color = 0xffffff77, border_radius = 4);
rect!(xy = slot_two, wh = size_two, color = 0xffffff44, border_radius = 4);
rect!(xy = slot_three, wh = size_three, color = 0xffffff44, border_radius = 4);
rect!(xy = slot_four, wh = size_four, color = 0xffffff44, border_radius = 4);
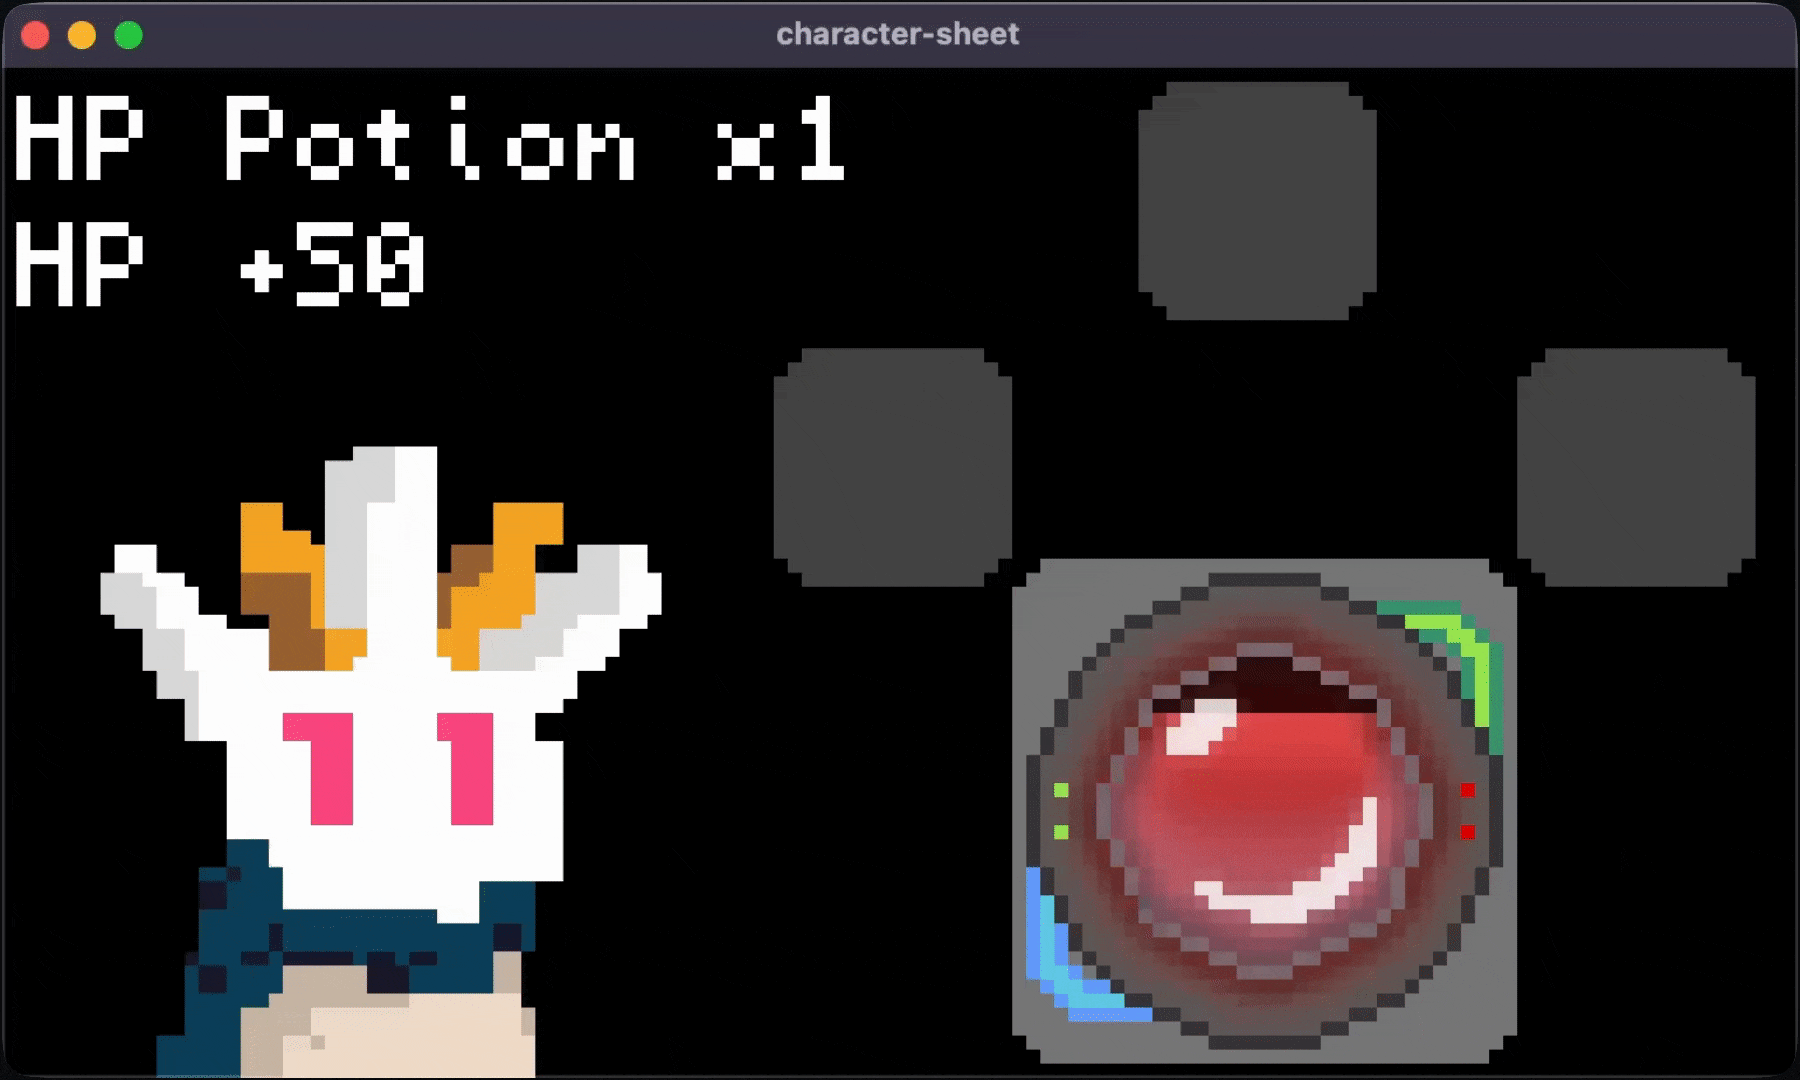
sprite!("potion#HP Charge", xy = if state.player.inventory_index == 0 {(slot_one.0 + 1.0, slot_one.1+ 1.0) } else { slot_one }, scale = if state.player.inventory_index == 0 {1.0} else {0.5});
sprite!(
animation_key = "character",
default_sprite = "player#Idle",
);
let debug = match state.player.inventory.get(state.player.inventory_index) {
Some(item) => format!("{} x{}\n{}", item.name, item.quantity, item.description),
None => "".to_string(),
};
match state.player.inventory_index {
0 => {text!(&debug, x = 47, y = 15)},
_ => {text!("Empty slot...", x = 50, y = 15)},
}
} And add the controls to lib.rs
pub fn update(&mut self) {
// This is where your main game loop code goes
// The stuff in this block will run ~60x per sec
state_machine(self);
if gamepad::get(0).a.just_pressed() {
self.screen = Screen::Inventory;
}
if gamepad::get(0).b.just_pressed() {
self.screen = Screen::Character;
}
if gamepad::get(0).x.just_pressed() {
self.screen = Screen::Loadout;
}
if gamepad::get(0).left.just_pressed() {
self.player.inventory_index = (self.player.inventory_index + self.player.inventory_slots - 1) % self.player.inventory_slots;
}
if gamepad::get(0).right.just_pressed() {
self.player.inventory_index = (self.player.inventory_index + 1) % self.player.inventory_slots;
}
}
We make use of camera::set_xyz tween and of course sprite! and rect! again.
The Tweens allow for smooth movement of the x and y values of our squares which are our inventory slots. We also change the size of each square if it is in the front slot. We also change the size of the item.
The controls change the value of state.inventory_index and we change the values of our tweens based on what that inventory index is. We have wrapping as well so we never hit an "end".
Zooming in with the camera allows you to see our character's face and item sprites as the player looks through their inventory. It also makes the item descriptions and names larger and easier to view. Our main character's idle animation has them blink, which is a nice touch while browsing the inventory system.
Next up is the Screen::Loadout
Loadout Screen
Add the following code inside the Screen::Loadout of our state_machine
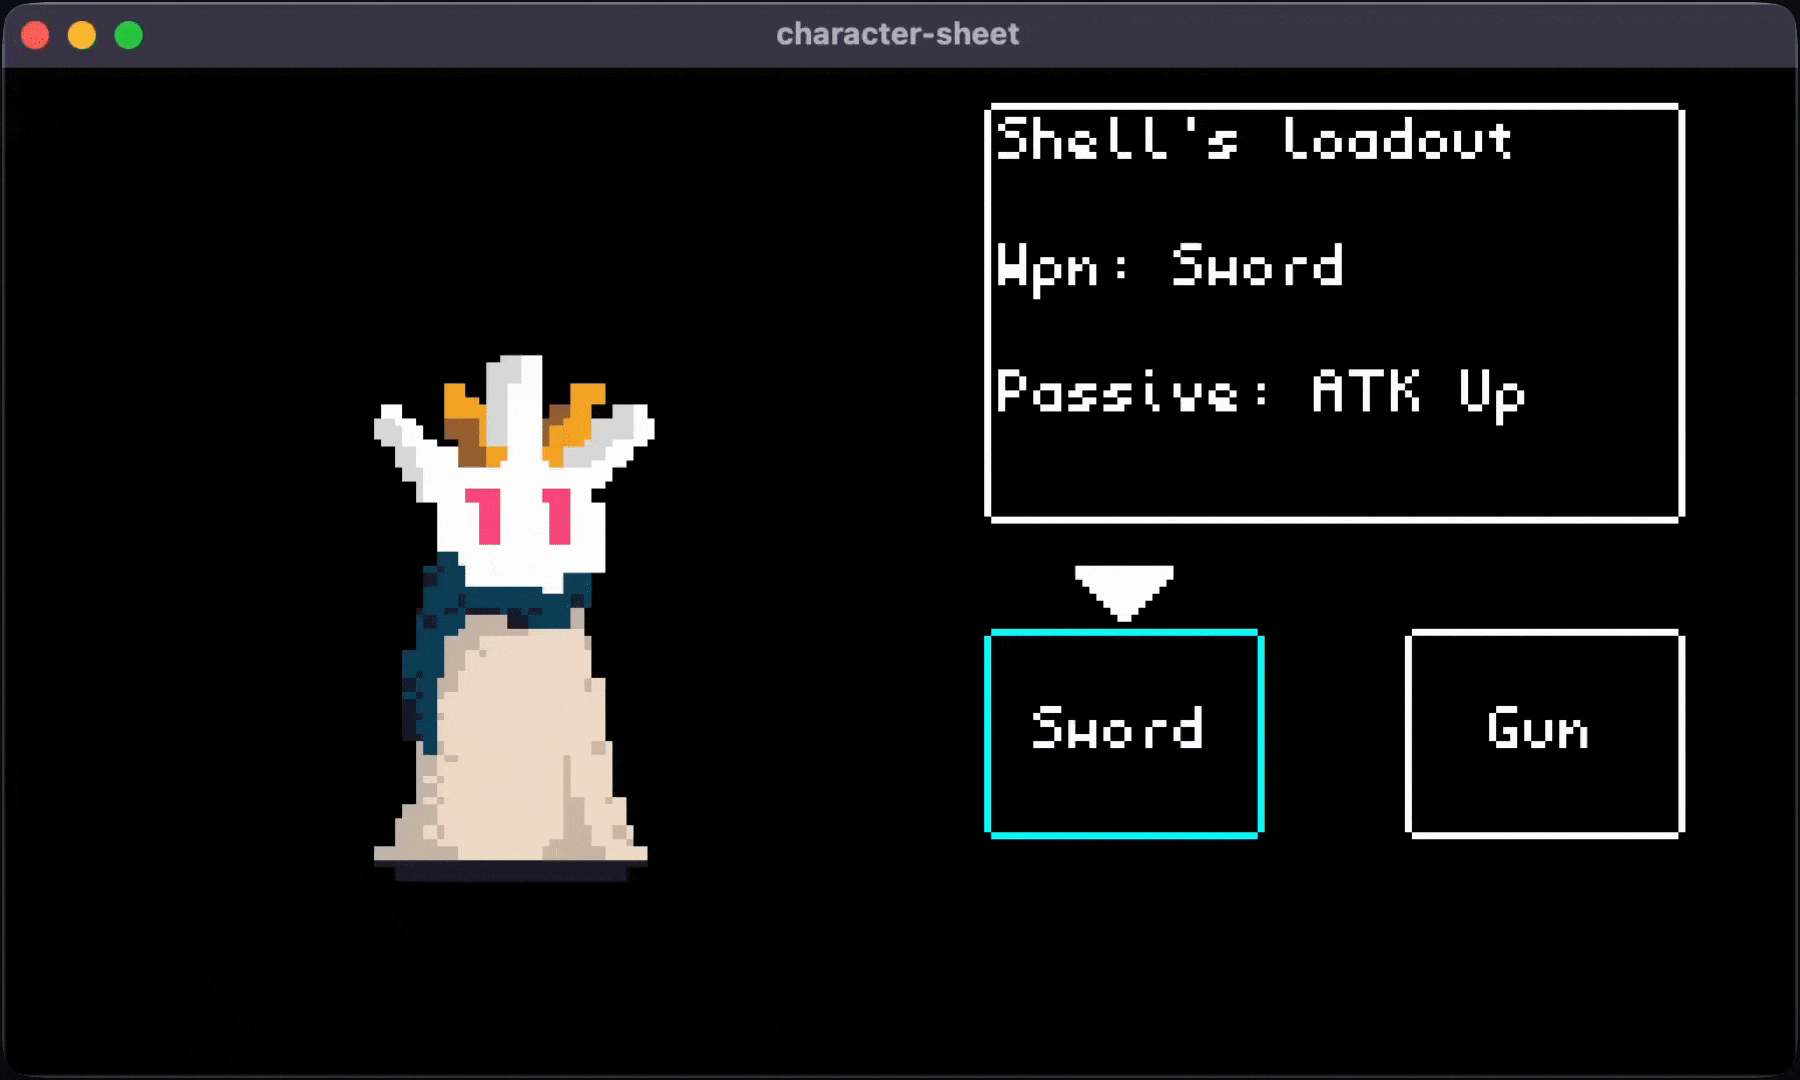
Screen::Loadout => {
let character = animation::get("character");
let equipcolorsword = if matches!(state.player.loadout.weapon, Weapon::Sword) { 0x00FFFFFF } else { 0xFFFFFFFF };
let equipcolorgun = if matches!(state.player.loadout.weapon, Weapon::Gun) { 0x00FFFFFF } else { 0xFFFFFFFF };
sprite!(
animation_key = "character",
default_sprite = "player#Idle",
);
rect!(x = 140, y = 5, w = 100, h = 60, color = 0x000000ff, border_color = 0xffffffff, border_size = 1, border_radius = 2);
let stats = format!("{}'s loadout\n\nWpn: {:?}\n\nPassive: {}", state.player.name, state.player.loadout.weapon, state.player.loadout.passive);
text_box!(&stats,x = 142, y = 6, w = 98, h = 129);
let sword = Bounds::new(140, 80, 40, 30);
let gun = Bounds::new(200, 80, 40, 30);
rect!(bounds = sword, color = 0x000000ff, border_color = equipcolorsword, border_size = 1, border_radius = 2);
rect!(bounds = gun, color = 0x000000ff, border_color = equipcolorgun, border_size = 1, border_radius = 2);
text_box!("Sword", x = sword.x(), y = sword.y() + 10, w = sword.w(), align = "center");
text_box!("Gun", x = gun.x(), y = gun.y() + 10, w = gun.w(), align = "center");
if state.player.loadout_index == 1 {
rect!(x = 215, y = 67, w = 10, h = 10, rotation = 45);
} else {
rect!(x = 155, y = 67, w = 10, h = 10, rotation = 45);
}
if state.equip {
match state.player.loadout_index {
0 => {
character.use_sprite("player#Sword");
character.set_repeat(1);
state.equip = false;
state.player.loadout.weapon = Weapon::Sword;
state.player.loadout.passive = "ATK up".to_string();
state.player.atk = 6.0;
state.player.crit = 2.0;
},
1 => {
character.use_sprite("player#Gun");
character.set_repeat(1);
state.equip = false;
state.player.loadout.weapon = Weapon::Gun;
state.player.loadout.passive = "CRIT up".to_string();
state.player.atk = 4.0;
state.player.crit = 20.0;
}
_ => {
}
}
}
rect!(x = 140, y = 65, w = 100, h = 6, color = 0x000000ff);
} Now we need to spruce up our controls in the lib.rs:
pub fn update(&mut self) {
// This is where your main game loop code goes
// The stuff in this block will run ~60x per sec
state_machine(self);
match self.screen {
Screen::Character => {
if gamepad::get(0).a.just_pressed() {
self.screen = Screen::Inventory;
}
if gamepad::get(0).x.just_pressed() {
self.screen = Screen::Loadout;
}
},
Screen::Inventory => {
if gamepad::get(0).left.just_pressed() {
self.player.inventory_index = (self.player.inventory_index + self.player.inventory_slots - 1) % self.player.inventory_slots;
}
if gamepad::get(0).right.just_pressed() {
self.player.inventory_index = (self.player.inventory_index + 1) % self.player.inventory_slots;
}
if gamepad::get(0).b.just_pressed() {
self.screen = Screen::Character;
}
},
Screen::Loadout => {
if gamepad::get(0).right.just_pressed() {
self.player.loadout_index = (self.player.loadout_index + self.player.loadout_slots - 1) % self.player.loadout_slots;
}
if gamepad::get(0).left.just_pressed() {
self.player.loadout_index = (self.player.loadout_index + 1) % self.player.loadout_slots;
}
if gamepad::get(0).a.just_pressed() {
self.equip = true;
}
if gamepad::get(0).b.just_pressed() {
self.screen = Screen::Character;
}
}
}
}
Awesome! Now we have controls that are specific to each state. We can enter our Screen::Inventory with a and we can leave with b. We can enter our Screen::Loadout with x and leave that screen with b.
On the loadout screen itself we can use the arrow keys to switch between sword and gun and equip it with a. After equipping our weapon of choice we get an animation to reflect what we have equipped as well as a blue highlight.
We made use of bounds for the sword and gun UI choices. Bounds is a useful tool when making your game work on multiple resolutions as well as adding touch/tap controls!
Conclusion
You have made a working character sheet! you used a lot of tools that will be valuable to master like the state machine, tweening, and bounds. You used the basics like rect! sprite! and text_box!.
You can use this as the start of an RPG game! If you want to do more, I suggest the following:
Next Steps
- Complete the
Questabove, post your results in the Turbo discord! - Try your hand at the pancake cat tutorial